Showing posts with label Sewing. Show all posts

Friday, June 14, 2013

Fixin my couch

I bought my couch 2 years ago off of craigs list, and it was not even a year old. It was EXACTLY what I was looking for. After having it for a while I realized that the top cushions were over stuffed and the bottom back cushions were under stuffed. Not ideal for someone with back issues.

Then a couple months ago Mark laid down on it. He just kind of plopped on the couch, not hard at all, and we heard this snap, and then something was protruding out of the back of the couch. Luckily not through the fabric. So I vowed to fix it. Oh, also it didn't have feet, I have wanted to put feet on it since we bought it.

So A while back I flipped it over and pulled out most of the staples on the lining and flopped it over so I could take a look in the couch. I could see the problem and I thought I could fix it, but when I tried It just didn't work. So I flipped the couch back over, pondering how in the world to fix it. For about 2 month the back rest of the couch leaned towards the back, not the front of the couch, and it was so uncomfortable to sit on.

My mom just reupholstered my sisters couch for her birthday last month. Her couch had amazing structure, but the fabric was ripped and quite worn.  My mom did a beautiful job.

(Marisa will insert a picture of her couch here) J

 So I got to thinking, my upholstery is great, but my structure is crap, so All I need to do if reinforce the structure. So then OFF came the back of the couch.
I love taking things apart, learning how the work and putting them back together.
So with the back off I could see the problem. The couch was build with freakin 1x2’s stapled together. WHO DOES THAT?!?!  You can see my little red arrows, these were some of the problem areas. The top one is pointing at a board that was supposed to be attached. That is what was sticking out of the back of my couch for months. 
So I used cardboard to create a pattern for 2 supports for the middle,  I used my cardboard pattern and cut 2 supports out of plywood. The structure is MUCH more solid with just a few simple changes. And I was happy cause I got to play with my power tools AND, they were a perfect fit. woot woot! J 

and then I braced and glued the broken piece back together.
(my random upside down pic)
That alone wouldnt be enough, but I'm hoping with the added braces that I made it will have enough support. 

Now on to the cushions. I need good support for my lower back. Someone got smart and put a ZIPPER on the lower cushions on the inside. SO easy to add the stuffing. BUUUT, the top cushions (which were WAY over stuffed) had no zipper. FACE PALM. So I got out the old seam ripper and ripped a hole in my couch. I pulled the stuffing out of the top, and added it to the bottom.  All the while flipping my couch right side up to sit on it and test it.

At one point when I was flipping the couch back down the tack strip caught my ear and nearly ripped it out of my head! (ok, maybe that was a little dramatic, but I did get cut, and it bleed a lot)

I also ended up making some feet for the couch.  It was just too short. Which is great for short people. I got nothing against short people. Infact, a lot of my friends are short people….it’s just not my thing. I would have seriously loved to make it SO high that MY feet dangled. How cool would that be!  But I would have had to make the feet like 8 inched tall, and at that point the become more like stilts then feet. But I still made them tall, they are 5 inches tall. I spent like $7 on a 4x4, and 2 on the special screws. I cut it, sanded them, stained them (I already had the stain) and I used my fancy drill press to get nice straight holes. So $9 for 4 feet, as apposed to $8 for one already made foot. See, and THIS is why I do it my self. :)
another sideways picture. 
 D wanted a picture of him, so I took his picture, then i realized this shows how tall the feet are :) 
Today my mom brought over the awesome upholstery staple gun. I put the feet together, and after the kids went to bed I turned on the air compressor and went to town. I tacked everything back down, screwed in my nice new TALL feet, and flipped that puppy over.

I FREAKIN LOVE MY COUCH! 

It’s tall, comfy, and has the back support that I need. And to all of my short friends, maybe I can make you a step stool J

When I started this project I thought I might like to actually make a couch some day…but now, I can say that making a couch is officially OFF the bucket list. BUT NOW I want to make a big cushy ottoman to match. If I ever  find the same fabric as my couch I’m totally going to buy it. 

Tuesday, October 30, 2012

Homemade Lederhosen with out a pattern

I just wanted an excuse to carry around one of my instruments this Halloween, so I decided to make Lederhosen and go as a member of a polka band. 

No pattern? No problem!

Took my favorite pair of shorts that fit me really well and turned them inside out. Stuffing one leg inside the other.

I tapered the legs a bit cause I wanted them slightly more fitted. Also made them plenty long on the bottom so I could have a 2 inch cuff below the knee

Cut 2 front and 2 back. leaving room for a seem allowance. 

NOTE: Always cut BIG. You can trim it down later if you need to, but you can't always add fabric

 Sew the legs together by sewing one front to one back with right sides together. (you can tell the front from the back cause the back piece will have a deeper curve for the crotch piece. Or you can make them uniform...it's just a costume after all :)
 I cut mien too small. I could put them on, but they were SUPER tight, so I added a 2 inch strip down the out side. Which I ended up liking better anyway. :)
 Now turn one leg right side out and one inside out. Stuff the right side out leg into the inside out leg. 
 Line of the crotch pieces and pin together starting with the middle first so your in seems line up
 Since I cut them straight at the top and a waist line is curved, I put them on and folded over where I wanted the waist band to go. Pined it down and then cut along the fold. 
 To make them more fitted and less like sweat pants I put them on inside out and marked where I wanted the darts in the back (which by the way is nearly IMPOSSIBLE to do by your self). I I got a general idea of shape, placement, and size by looking in the mirror and then just eye balled it. 
I looked adn measured before I sewed to make sure the darts were straight and centered. And I got it just right. Whew!

Then I moved on to the embroidery. My mom has an Embroidery machine, so my plan was to go over and use it. Well....plans changed, she has been sewing like crazy getting ready for a wedding, so I had to go another route.

I drew up what I wanted it to look like with the help of Google Image search
 Then cut out around the shaped and traced them with a pen on my fabric, then I just filled in the lines when I took the paper off free hand. 
 Then I put in some nice orange thread and just sewed over the lines I had drawn...making it up as I go at some points :)


 Then I put the arrow shaped ones on the pants to mark where I needed to cut

 Right sides together I sewed the back on the arrow parts, then turned them right side out and dud a top stitch all the way around
 Did the same with the rectangle piece, but I left the bottom open so I could sew the arrow pieces into it. 
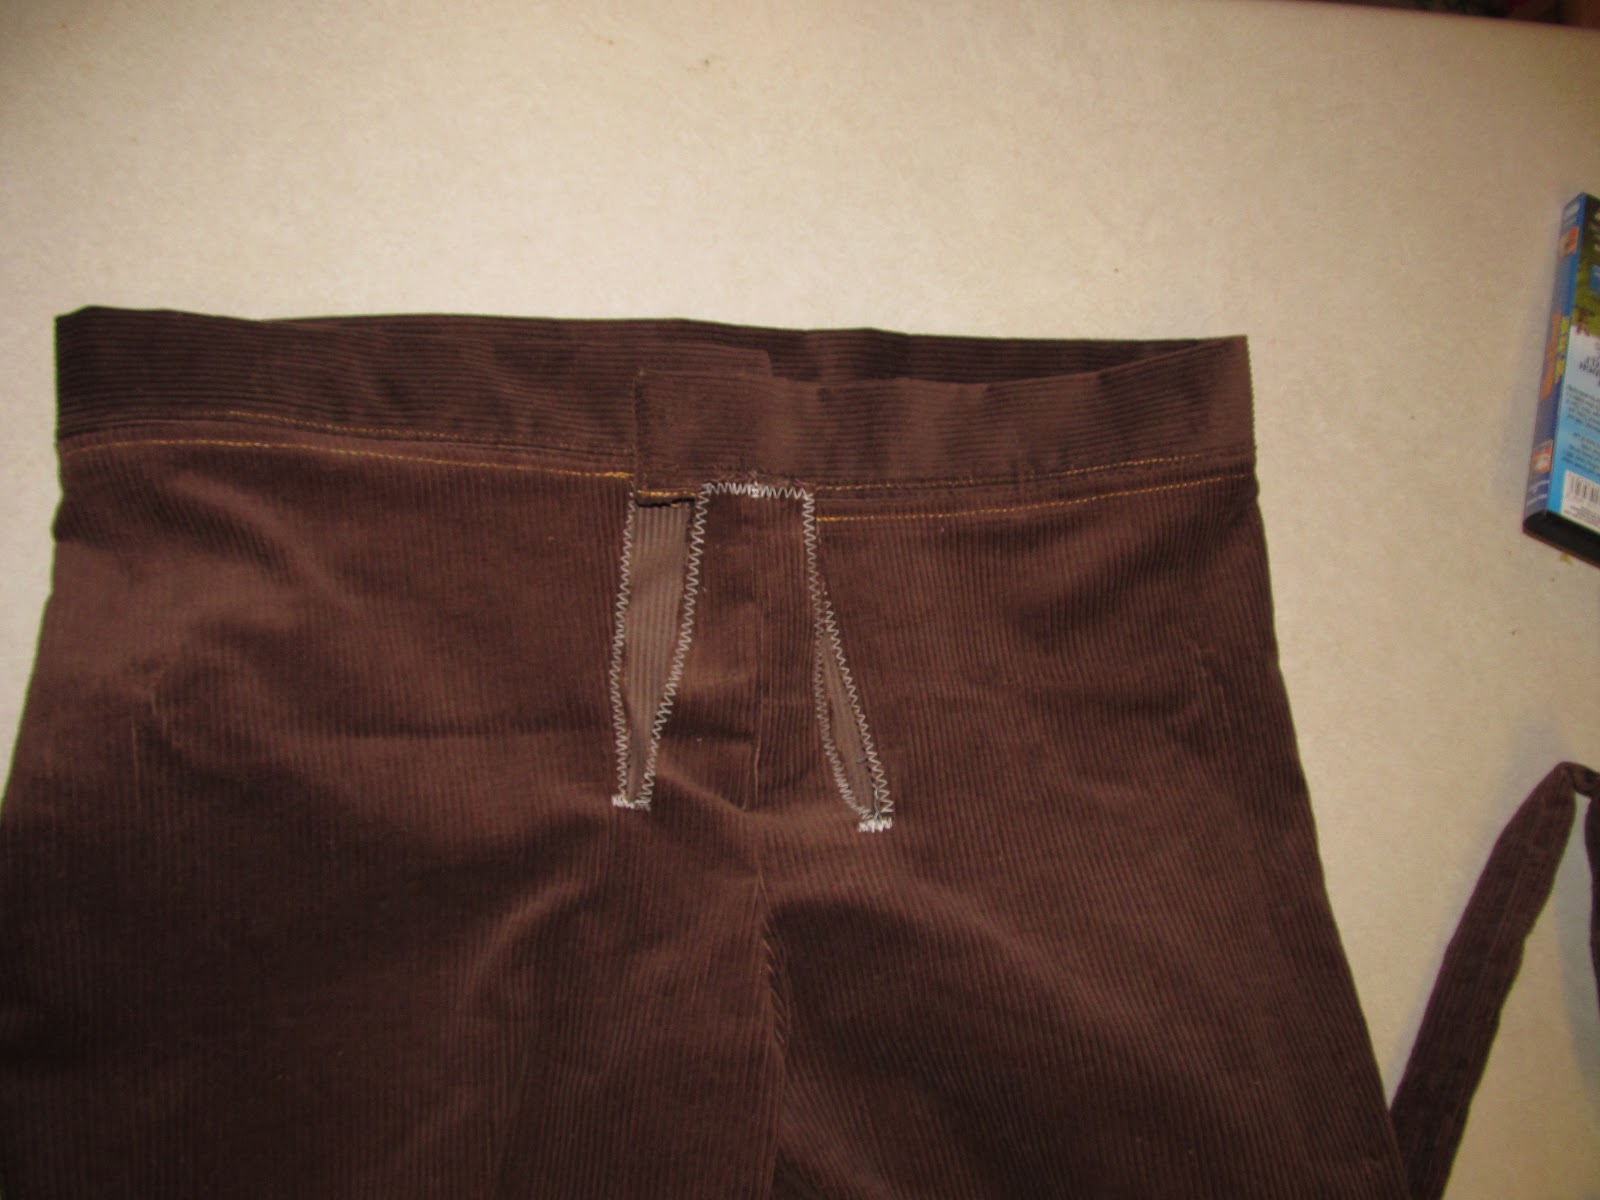
 Then I had to zig-zag stitch all around the waist and fly to keep it from unraveling, and added the waist band. It was just a long strip the length of my waist and about 4 1/2 inches wide. Then I put a top stitch on for decoration and to hold everything down. 
 Place the arrow pieces on and sew them toe the flap of the fly
 Then I did a totally unnecessary decorative stitch to accent it
 Slip the arrow pieces in the rectangle piece and sew them together with a top stitch going across the bottom of the rectangle. 

I added the suspenders next, making sure they were loose enough so I could bend over. I sewed them on, then added the buttons. Only one is actually useful  the one on the waist band. All 12 of the others are purely decoration. And with 13 buttons I'm SO glad I learned how to do it on my Machine. If you haven't done it yet, pull out your manual and try it! It's SO easy and saved so much time. 

I ended up using velcro to keep the fly up cause I sewed the button holes in too high, but it works great. 
 See, the buttons totally make this costume.
 Lederhosen has buckles on the straps. I didn't have buckles but I did have some D loops that fit, so I threw them on  just for kicks. 

NOTE: I don't ever throw a bag or belt away with out first ganking off all the straps buckles hooks or any other hard ware I can find. It comes in handy!
...now I just need to learn how to yodel...

Monday, October 15, 2012

Glove pattern

So I was going to make some cool gloves for the Darth Vader costume, that extend up the arm and have that little flare thing going on like Vader's gloves. I found this glove pattern on Google Image Search, and all I had to do differently was add the extended portion. 


So I cut them out this morning and then as I was starting to zig zag around the edges so the fabric I got wouldn't fray I remembered something. I HATE sewing TINY details. And to make these for a 3 year old, they are quite small...so I stopped  I'm going to opt for $.97 black knit gloves from Wal Mart. . But I thought I'd share the pattern any way. 

Remember the trick of saving the image to your computer, then zoom in or out till you get the size you want, then trace it off the screen. 

Sunday, October 14, 2012

Captain America Shirt

Hooded Captain America Shirt.


Start by cutting out red and white strips of fabric (if you make them too wide, don't stress, just start over). Sew each strip of fabric in a red white red white pattern together.

Once they're sewn together, cut it into a mountain shape. Yeah you could go easy and make it straight...but it wouldn't look as much like the captain america in the movie. (but if the curve scares you, you can always skip this step.
 Now for the front of the shirt. Take a regular shirt that fits your kid and turn it inside out. Then lay it on your prefered fabric and fold in the sleeves so you can see the "outline" front piece. Cut your fabric around the shirt. (if it helps you can pin the shirt to the fabric like a pattern).
Now you lay your "mountain stripes" on the front of your cut out t shirt (remove the shirt you used as a pattern before this step), you can pin the stripes to the shirt to make them sit still, then cut off the bottom of your shirt to replace with the stripes. Now you just have to fold them together and sew them. EASY....maybe.


UH OH! The pieces don't just SEW together....hum. that takes some thinking..... Pin the middle of your stripes to the middle of your shirt. Now we can flip it over and work our way out.

Now pin the mountain corners . Tuck your blue fabric, but try not to make it tucked where you pin. you want this to look pretty much flat so just pull it tight while you pin it to the edges.

 Once the edges are pinned, sew carefully around your "mountain" taking out pins as you go. Go slow and turn your fabric as needed, and pull extra fabric away from the seams to keep it from puckering. If you're using an old t shirt you can skip this next part, but I used a sheet.....sheets unravel a lot, and quickly. So after you sew it, do a zigzag stitch on the edge to keep it from falling apart.

Now unfold it. WOW! that looks like the front of captain america's shirt....aren't you impressed?

Now take the shirt you were using for a pattern and put it on your blue fabric again. Fold the sleeves in again and cut out around it to make the back of your shirt. This time you don't have to cut off the bottom for the stripes. Now, put the outside of the pieces together so the seams will be on the inside of the shirt. Sew the shoulders together, and also sew just the straight part of the sides. **don't forget to back stitch at the beginning and the end of each seam** Now if using a fabric that unravels, do your zigzag stitch on the edges.    You should now have a sleeveless shirt when you turn it right side out. 

Next we make a hood (you can find instructions for that here) or you can skip. But in the movie...Captain America has a mask AND a hood underneath it. Just be sure if you skip the hood to zigzag/finish your edges on your neck hole. Have your child try on the shirt and the hood at the same time, mark with chalk, or straight pins (if your careful) where the shirt and the hood meet up on your child.

Once your hood is made turn it right side out. Turn your sleeveless shirt inside out.  Now, find the middle of the back of your hood by laying it flat, mark the middle with a straight pin. Find the middle of the back of your shirt as well (just fold it in half) and mark JUST THE BACK of the shirt with a straight pin. Then do the middle of the front of your shirt with another. Don't pin anything but your ONE piece of fabric that you're finding the middle of. Now, put your right side out hood upside down, in your inside out shirt, so the neck parts will sit together. Using your pins as a marker, pin the middle of the back of your hood to the middle of the back of your shirt. (Make sure you stay on your chalk/pinned line that you made earlier.) Pin your way around to the front making sure the middle of the front of the hood, meets up with the middle of the front of your shirt.

Picture of the hood and shirt sewn together.
Sew them together being careful not to sew on top of any other part of your shirt. Make your zigzag stitch around the edges to keep it from unraveling. Now turn it inside out and have your kid try it on. At this point...I was kind of regretting not using a fabric that stretched. My son couldn't get his head in his shirt, so I had to cut a line down the middle until he could fit through. Once I had the front cut I zigzaged the edges. I didn't bother turning in the raw edges. It's a costume, and looked fine with just a zigzag.

Sleeveless Hooded shirt. Now I was sad cause where the Captain America star is supposed to go, there is a great big slit. It's ok, I found a way to make it look right . But first, lets put the sleeves on the shirt.

If your pattern shirt has long sleeves just fold your fabric in half and put your sleeve on the fabric. Make sure you have the fold of your fabric where the fold of your sleeve is. Then cut it out. When you unfold your sleeve it should look like this. You will need two of these. If you don't have long sleeves on your "pattern shirt" no sweat. Just measure the length of your child's arm (from top of shoulder to wrist) and add a little extra for a seam allowance. 

Now my fabric had a soft side and a shinier side. I wanted the soft side on the inside. So make sure you always sew with you inside (the soft side) facing you. (unless told otherwise). Fold your sleeve in half with the soft side out, and sew up the long part of the arm. Make your zigzag stitch, then do the same to the other sleeve. **Don't forget to back stitch at the beginning and end of each seam** Turn your sleeves right side out. and once again, turn your shirt inside out. Pin the top of your sleeve to the top of the arm hole and work your way around. I would pin under the armpit last just in case you have to fold over the fabric to make it fit.

Sleeves sewed on. Inside out view.
Sew your arms on, being careful once again to keep the rest of your shirt out from under the presser foot. Do your zigzag stitch and turn the whole shirt right side out. It should be looking pretty awesome by now. Go ahead and finish off your sleeve edges and the bottom of your shirt with a zigzag stitch. Now for the star on the front.


Cut a star out of foam (or your fabric if you want, just make sure you finish the edges) and glue some velcro to the back. Sew on two squares of velcro on either side of your cut front of your shirt. (I just used velcro with adhesive on it, but beware when you sew it on with the adhesive it makes your needle sticky and might seize up your sewing machine) 


Now, velcro the star over top of your seam and TADA! Captain America at his finest.
I added an extra strip of blue fabric to the end of my sons shirt so it wouldn't com untucked while he was playing. Helps out tremendously.